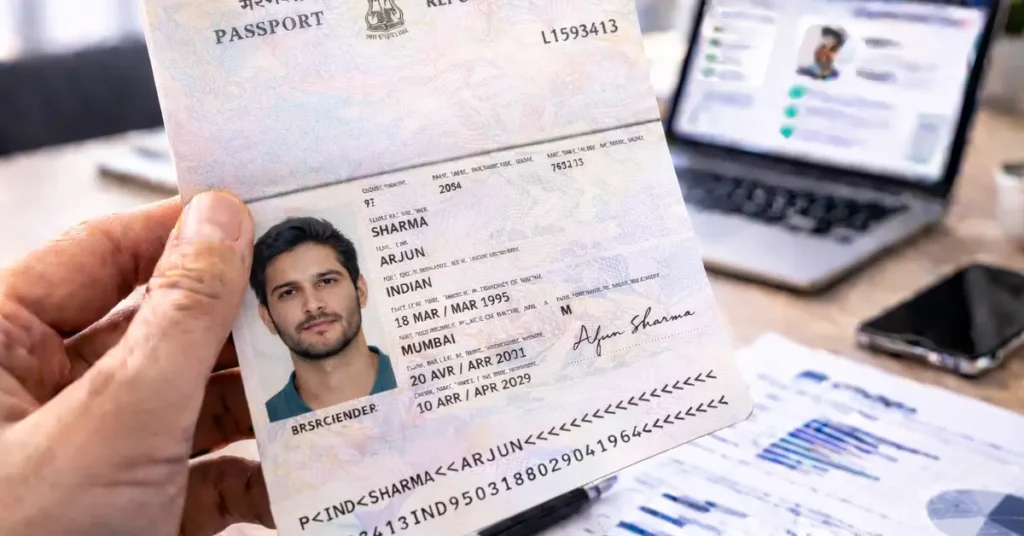
The Indian passport is an official document widely used as proof of identity in many contexts: KYC checks, international travel, administrative procedures, digital platforms, or banking processes.
Like any identity document, it can nevertheless be subject to document fraud attempts: expired passports, visual alterations, inconsistencies between the visible information and the MRZ, or tampering with security features.
How can you verify an Indian passport online and ensure that the document presented is authentic?
The answer is in this guide, through 4 essential checkpoints.
Need more information on how to verify the authenticity of your ID documents ? Check out our comprehensive guide to verifying ID documents, which includes all the resources available !
Check 0: automatic online verification of an Indian passport
Before any visual inspection, it is now possible to perform an initial automatic check from a simple image of the passport.
This step notably enables:
- automatic reading of the MRZ
- validation of the check digits
- consistency checks of the fields (name, date of birth, sex, nationality, document number, expiry date)
- detection of input errors or common inconsistencies
⚠️ There is no public database that allows you to officially validate an Indian passport.
Online verification therefore relies on document analysis and must be completed with a visual inspection of the security features.
Check 1: general appearance of the Indian passport
When access to the original document is possible, the first step is to examine the overall appearance of the passport.
The document should show no signs of cutting, delamination, gluing, overprinting, or visible modifications.
Particular attention should be paid to:
- the biographical data page
- the photo area
- the edges and binding of the booklet
- areas printed in relief or with extra thickness
Any signs of scraping, heating, partial replacement, or retouching are red flags.
Check 2: cross-checking and consistency of information
The second step is to verify the consistency of the information visible on the passport and its match with the data encoded in the MRZ.
Items to cross-check as a priority:
- Document number: visible on the identity page and in the 2nd MRZ line
- Date of birth: shown on the passport and in the MRZ (YYMMDD format)
- Surname and given name(s): visible on the document and in the 1st MRZ line
- Holder’s sex: indicated by “M” or “F”, visible on the passport and in the MRZ
- Expiry date: shown on the identity page and in the MRZ
- Issuing country and nationality: consistent with the ISO codes present in the MRZ
Any discrepancy, even minor, between the visible fields and the MRZ should be considered a red flag requiring further examination.
Document number
You can find the document number in two different places: at the top right on the data page and at the beginning of the second MRZ line.
Both must be identical:

Date of birth
Here again, you can find the holder’s date of birth in two distinct places: in the middle of the data page and in the middle of the second MRZ line in YYMMDD format:

Surname and given name(s)
The same applies to the surname and given name(s), which you can find on the document and in the first MRZ line:

Holder’s sex
The holder’s sex is indicated by “M” for men (male) and “F” for women (female). You can find this information on the data page and in the second MRZ line:

Document expiry date
Another element that appears twice on the document is the expiry date, which you can find on the data page as well as in the second MRZ line in YYMMDD format:

Issuing country
You can find the issuing country in two places on the document: at the top of the data page and at the beginning of the first MRZ line.

Nationality
You can find the holder’s nationality in the second MRZ line in ISO 3166-1 format:

Individuals, do you occasionally need to verify one or more identity documents ?
Professionals, do you need to integrate proof of identity validation into one of your business processes, including all European identity cards and global passports ?
Check 3: verifying the MRZ and security check digits
The Indian passport contains an MRZ made up of two lines, compliant with ICAO standards.
The MRZ contains the document’s main information in a standardized form and includes five check digits, designed to detect reading errors and many tampering attempts.
MRZ analysis makes it possible to:
- verify the document structure
- mathematically validate the encoded data
- detect transcription errors or inconsistencies
The check digits are based on the standard ICAO algorithm, using fixed weights (7, 3, and 1), making this verification reliable, fast, and easy to automate.
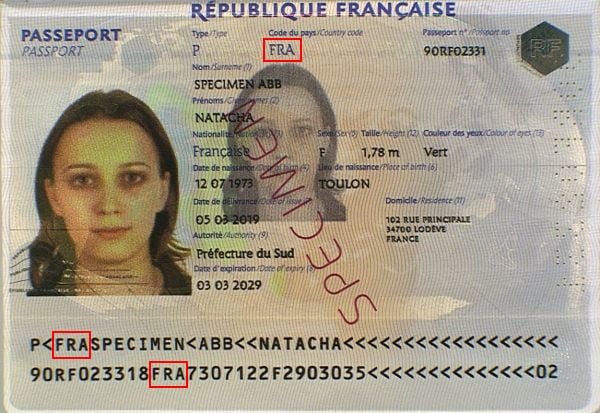
Structure of the Indian passport MRZ
First line

- Document type: 2 characters, code indicating the document type, represented by the letters “P<”.
- Issuing country: 3 characters, the ISO 3166-1 alpha-3 code of the issuing country.
- Surname(s): holder’s surname(s), separated by a chevron “<”.
- Given name(s): holder’s given name(s) separated from the surname by two chevrons, and separated from each other by a chevron “<”.
Second line

- Document number: 8 characters, passport number printed on the document.
- Check digit: 1 character, check digit for the document number.
- Nationality: 3 characters, holder’s nationality.
- Date of birth: 6 digits, holder’s date of birth in YYMMDD format.
- Check digit: 1 character, check digit for the date of birth.
- Sex: 1 character, holder’s sex (“M” or “F”).
- Expiry date: 6 digits, passport expiry date in YYMMDD format.
- Check digit: 1 character, check digit for the concatenation of characters line 2 44-54, line 2 57-64, line 2 65-87.
Verifying an Indian passport using the MRZ check digits
An Indian passport contains 5 check digits (or security digits) that validate the information that precedes them.
They help prevent transcription errors or alterations, whether intentional or not.
How does the algorithm work?
The algorithm used to create and validate check digits is common to all identity documents: characters have a value that is multiplied by a factor based on their position in the string (7, 3, and 1).
Digits keep their numeric value (“0” is 0, “1” is 1, and so on up to “9” which is 9). The chevron “<” also has a value of 0, while letters start at 10 for “A”, 11 for “B”, up to 35 for “Z”.
Example
Let’s take as an example the check digit for the date of birth from the specimen above.
The string to validate is the following: “860610”.
To calculate the check digit, we will proceed as follows:
– “8” has a value of 8 and is in the first position, so it must be multiplied by 7: 8 * 7 = 56
– “6” has a value of 6 and is in the second position, so it must be multiplied by 3: 6 * 3 = 18, which is added to the previous 56, i.e. 18 + 56 = 74.
– “0” has a value of 0 and is in the third position, so it must be multiplied by 1: 0 * 1 = 0, which is added to the previous 74, i.e. 0 + 74 = 74.
– 6 * 7 = 42 and 42 + 74 = 116
– 1 * 3 = 3 and 3 + 116 = 119
– 0 * 1 = 0 and 0 + 119 = 119
We therefore obtain a total of 119, from which we take modulo 10 (the remainder of the division by 10), which means keeping only the last digit, i.e. “9”.
Our check digit is therefore valid because 9 is the digit shown on the document!
Check 4: verifying physical security features
This final step aims to confirm the material authenticity of the Indian passport.
It complements document analysis by examining security features that are difficult to reproduce, including:
- holographic films and devices
- watermarks and security films
- a secondary “ghost” photo
- secure printing, microtext, and iris printing
- optically variable inks (OVI)
- elements visible only under ultraviolet (UV) light
Some of these features can be checked with the naked eye, while others require specialized equipment.
Front of the biographical data page
")
Back of the biographical data page
")
Letter Screen Image (LSI)
The Letter Screen Image (LSI), also known as a ghost image, is a second representation of the passport holder’s portrait. This image is smaller, with reduced contrast and saturation, and appears as a shadow of the main portrait.
Unlike a hologram, the LSI relies on a similar security principle, but it is made up of extremely small microtext containing the holder’s personal information (name, date of birth, address, file number, etc.). This microtext visually forms the ghost image of the portrait.
This data is not visible to the naked eye, but can be seen with a magnifying glass. This process makes counterfeiting extremely difficult, because the LSI is generated and printed securely during passport production.
Introduced in Indian passports in 2013, the LSI is printed in light sky blue, with microtext arranged in a spiral pattern rather than a linear one, further strengthening the document’s security.
")
Barcode
The barcode is a way of storing data as a pattern of lines or shapes. In the Indian passport, this barcode contains information encoded as alphanumeric characters.
It uses the ASCII 128 standard, which makes it possible to encode the full set of alphanumeric characters. The barcode is mainly generated from the holder’s passport number and helps with identification and automatic data reading by IT systems.
This feature improves verification speed and contributes to passport security by enabling reliable data validation.

Laminated film
Passport lamination is a security layer applied to the personal data page to protect information against fraudulent alteration. Initially, lamination was placed on the inside of the passport cover, but it moved accordingly when the biodata page position changed.
It is applied using a special film called HAUV (Heat Applied Ultra Violet), fused at a temperature between 160 and 180°C, ensuring a permanent bond that is difficult to counterfeit.
Recent passports include double lamination, meaning both biodata pages (front and back) as well as their reverse sides are laminated. This reinforced protection is included on pages 1, 2, 35 and 36 (for 36-page booklets).

The laminated film also contains visible and invisible security features:
- Under normal light, you can read “GOVERNMENT OF INDIA” (English) and “BHARAT SARKAR” (Hindi).
- Under ultraviolet light, these texts appear in red (English) and green (Hindi), respectively.
These characteristics help enhance security and detect tampering attempts, making data modification or replacement extremely difficult.

Dicuts
Dicuts are horizontal and oblique security lines present on the personal data (biodata) pages, on both the front and back. These elements are a physical security measure designed to protect the document against counterfeiting.
In older Indian passports, two special dicuts were present on the front biodata page, shaped as the outline of the Ashoka Pillar, an official symbol of India. However, this feature has been removed in more recent passport versions, likely in favor of more advanced security devices.

Conclusion
You now have a structured method to verify an Indian passport online: MRZ analysis, cross-checking of information, then a visual inspection of security features.
Without specialized equipment, this combined approach already makes it possible to detect a large share of common document fraud attempts.
To go further, you can also use an online document verification solution.
For example, TrustDocHub can automatically verify an Indian passport from an image and return the results directly in the application.
Individuals, do you occasionally need to verify one or more identity documents ?
Professionals, do you need to integrate proof of identity validation into one of your business processes, including all European identity cards and global passports ?